


Understanding the natural chain of movement
– March 1, 2023
In this article I am going to share a practical drill that you can use at home and on the range. It will quickly give you the feeling of the movement sequence you are after, so you can ‘feel’ this movement in your shots, which means you won’t have to think about it!
Now, before we get into the drill, it is worth understanding the role of fascia in your structure, partly because it can help to create a good mental image of using your body as a whole rather than as separate parts.
In simple terms, the kinematic chain starts in your feet and works up through each set of joints to the shoulders, before going out through the arms into the wrists and hands. This chain not only has a natural order to it, but in the golf swing it creates a natural shape which is one of a twist or spiral.
To help you picture why the body moves this way, here is some basic but not commonly-known anatomy.
Fascia is an elastic tissue-like material. I was introduced to fascia and its role in the body by Joanne Avison, a brilliant therapist in fascia work. Joanne explained to me that fascia is best described as a stocking that wraps round the bones, muscles and joints.
Tom Myers’ work Anatomy Trains reveals how there are various lines of fascia within our structure, and of particular interest to golfers is the spiral line which runs from under your foot like a stirrup behind your bottom before crossing to loop over the opposite shoulder. This spiral line is one connective tissue, or stocking. The same is present on the other side. With this in mind, you can see why there is a physiological reason why we spiral, or twist, in the swing.
Let’s now start the spiral drill and, as you do so, use the images to help you visualise this internal connection.
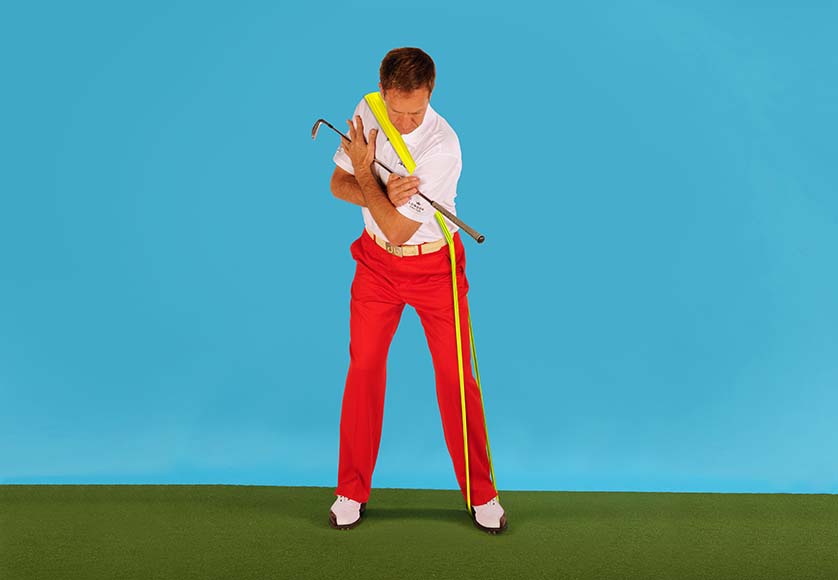
Start & Backswing
Criss-cross your arms to hold a club across your chest (photo 1), and take up a balanced and grounded posture position. Begin the movement with a gentle feeling of pushing the ground away from under your left foot.
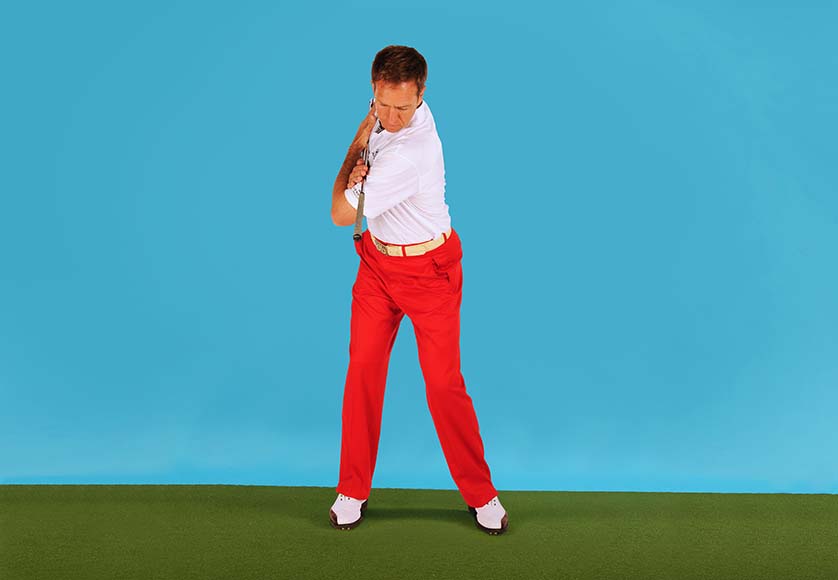
This simple move starts a natural chain reaction running up through the right side of your body; the ankle joint opens up the knee joint, which opens up the hips, and so on. By the time you get to the shoulders and upper spine, you have only about 20 degrees left to complete your backswing. You can see here how the spiral drill makes a connection from ankle to shoulder, just as your fascia does (photo 2).
Here is a single thought to simplify this: as you start your backswing by triggering the left foot against the ground, simply feel the spiral going all the way to the right shoulder.
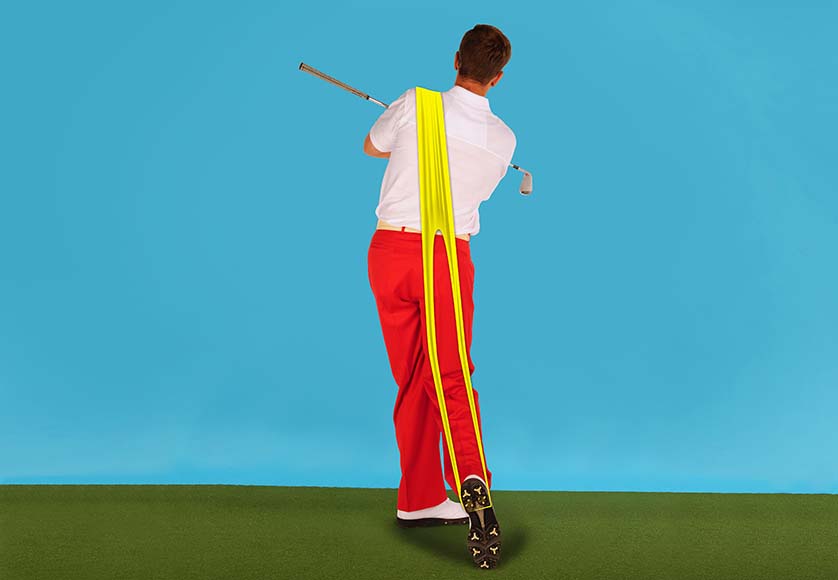
Downswing
You may find the above thought is enough and there is no need for a downswing thought; but if you needed one, it would, of course, be the reverse, i.e., the right foot initiating the transfer back to your left side, and the spiral going all the way to the left shoulder (photo 3).
For many players, it can even be enough to just start the swing from the ground with the left foot as described and the rest automatically happens. After all, this is the way the body wants to work.
I suggest practising this movement little and often. Consider having a spare club in your living space so you can easily practise this movement for just a few minutes. Doing so will pay huge dividends, but, of course, make sure you practise each movement mindfully and from a balanced and grounded posture.
Common problems resulting from poor sequencing
Now we have gone through this spiral drill, it is a good time to look at some of the more common thoughts associated with trying to achieve a full swing and the problems likely to arise from them.
■ Trying to turn the shoulders 90 degrees. This can result in overuse of the top half, leaving the legs below to try and keep you stable – which stops them being dynamic.
■ Getting the club to parallel at the top. This puts emphasis on the hands and arms to complete the swing and can often have a lifting effect, which weakens your connection to the ground.
■ 45-degree hip turn. Too much emphasis here can shunt the knees and ankles, causing the legs to straighten and lose their spring.
I hope this article will help you focus on whole movements rather than the individual parts, which, in turn, will lead to a better feeling for your swing and more shots out of the centre of the clubface!
If you have any questions or would like to find out more about my coaching in the Algarve and UK, please visit www.scottcranfield.com or contact me on [email protected]
For more tips to help your golf visit, go to https://www.facebook.com/intuitivegolf
By Scott Cranfield
Scott Cranfield is a PGA Master Coach. For over 30 years, he has dedicated his life to helping golfers achieve their goals through a natural approach that embraces the true laws of how the human mind and body work. Scott’s unique approach has led to the creation of multiple training programmes, and the experience of coaching every standard of golfer from complete beginners through to Ryder Cup players. As well as enjoying a long TV career with Sky Sports and Setanta TV, in 2011 Scott was honoured with the award of PGA Master Professional & Coach.
Read more:
Golf Tips: How to make good golf shots and control de ball
Discover the importance of going back to the basics to improve your golf
The importance of mind & body to the perfect golf swing
Want to know the secret to better golf? It’s all in the feet